Motorcycle punctures. Let’s face it we have all been there. Punctures are every motorcycle rider’s worst nightmare so it’s crucial to be prepared for the unexpected. A well-stocked motorcycle tyre repair kit is a must-have for any rider. To help you negotiate the pitfalls of roadside repairs we have tried to make a guide for how to use motorcycle tyre repair kit to get you back on the road safely and efficiently the Zenith Motorcycles way.
There are numerous repair kits on the market so we have tried to make this guide generic to cover all types.
Essential Items in Your Tyre Repair Kit

A complete tyre repair kit should include:
Tyre Plugs (also known as tyre strings or worms)
Insertion Tool (T-handle or pistol grip)
Reamer Tool (T-handle or spiral)
Rubber Cement or Glue (some kits)
CO2 Cartridges with an Inflator Nozzle or a Portable Air Compressor
A Sharp Knife or Scissors
Pliers or Multitool
Tyre Pressure Gauge
Chalk or Marker
Detailed Step-by-Step Guide to Using a Motorcycle Tyre Repair Kit
Ensure Safety First
Find a Safe Spot: If you experience a flat tyre while riding, find a safe and level area to stop. Avoid stopping on curves or narrow shoulders. Try to avoid parking on a soft surface such as grass or mud.
Engage Hazard Lights: Turn on your hazard lights (if available) to alert
other motorists of your situation.
Identify the Puncture Location
Visual Inspection: Carefully inspect the tyre for visible punctures. Look for nails, screws, or other sharp objects lodged in the tread.
Auditory Clues: If the puncture isn’t visible, listen for a hissing sound that indicates escaping air.
Mark the Puncture: Use chalk or a marker to mark the location of the puncture for easy identification during the repair process.
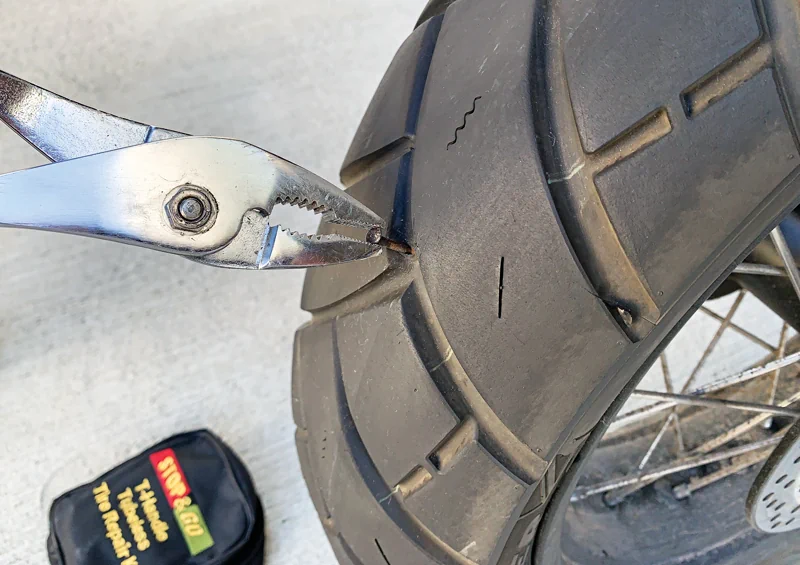
Remove the Foreign Object
Use Pliers: Carefully use pliers or a multitool to extract the object from the tyre. Be gentle to avoid causing further damage to the tread.
Prepare the Puncture Hole
Insert the Reamer Tool: Insert the reamer tool into the puncture hole (certain kits).
Clean and Widen the Hole: Twist the reamer tool while pushing it in and pulling it out to clean and slightly widen the puncture hole. This ensures the plug will fit securely.
Prepare and Insert the Plug

Thread the Plug: Thread a tyre plug through the eye of the insertion tool. If the plug is difficult to thread, you can fold it in half before inserting it into the tool.
Apply Rubber Cement (certain kits): Apply a generous amount of rubber cement or glue to the plug, ensuring it is well-coated. This helps the plug adhere to the tyre and creates a better seal.
Insert the Plug: Push the insertion tool with the plug into the puncture hole until only a small portion of the plug remains visible outside the tyre.
Insert the Plug: Push the insertion tool with the plug into the puncture hole until only a small portion of the plug remains visible outside the tyre.
Remove the Tool: Quickly and firmly pull the insertion tool out, leaving the plug in place within the tyre.

Trim the Excess Plug
Cut Flush with the Tyre: Use a sharp knife or scissors to trim the excess plug material, leaving it flush with the tyre surface. This prevents the plug from being pulled out during riding.
Reinflate the Tyre
CO2 Cartridges or Air Compressor: Attach the CO2 inflator nozzle to the valve stem and use the CO2 cartridges to inflate the tyre. If using an air compressor, connect it to the tyre valve and inflate to the recommended pressure.
Check Tyre Pressure: Use a tyre pressure gauge to ensure the tyre is inflated to the manufacturer’s recommended PSI. Refer to your motorcycle’s manual for the correct tyre pressure.
Check for Leaks
Inspect the Repair: Listen for any hissing sounds and visually inspect the repair site to ensure no air is escaping.
Monitor Tyre Pressure: Recheck the tyre pressure to confirm it is holding steady and not decreasing.
Perform a Test Ride
Short and Cautious Ride: Take a short, slow ride to ensure the repair holds and the tyre feels stable. Pay attention to any unusual vibrations or noises.
Recheck the Repair: After the test ride, inspect the repair site again and check the pressure one more time to ensure everything is secure.
Final Tips for Tyre Repair Success
Regular Tyre Inspections: Frequently check your tyres for wear, damage, and proper inflation to prevent unexpected flats.
Familiarise Yourself with the Kit: Practice using your tyre repair kit before you need it in an emergency to build confidence and ensure you know how to use all components.
Restock the Kit: After using the repair kit, replenish any used items to ensure you’re always prepared for future emergencies.
How to use Motorcycle Tyre Repair Kit Conclusion
Being prepared with a motorcycle tyre repair kit and knowing how to use it can significantly impact your riding experience. By following this detailed guide, you can handle a flat tyre with confidence and get back on the road quickly. Safe riding!



Your blog is a true hidden gem on the internet. Your thoughtful analysis and engaging writing style set you apart from the crowd. Keep up the excellent work!